
MENUMENU
TALK TO AN EXPERT
Special Hours: 7AM – 6PM PST
TALK TO AN EXPERT
Special Hours: 7AM – 6PM PST
Does your RV or boat need some electrical work done? The thought of doing your own electrical wiring can be intimidating, but it’s actually much easier than you think. In this article, we explore electrical wiring basics you’ll need to know when tackling your next project. These include the tools you’ll need, how to choose the correct wires, and ultimately, how to install the electrical wiring. Let’s get started.
Here are some of the electrical wiring basics to know before you start drilling holes and snipping wires. It doesn’t hurt to have a refresher, even if you already know some of this information.
Ensuring there are no live wires in your boat or RV is probably the most important thing you can do before beginning your electrical project. You might be thinking this step is obvious, but it’s surprising how many overlook it.
If you know for sure what circuit you are working on, you can turn off the breaker or pull the fuse, but if you are unsure you may need to disconnect from shore power altogether. In addition to being unplugged from shore power, you’ll want to disconnect your batteries from the main distribution box. It’s just flipping a switch if you have a battery disconnect switch, but you could also disconnect the negative cable coming from your batteries.
Keep in mind that even if you have turned off the power you should always double-check that there is no power with a multimeter. To do this first check the meter on a live circuit to make sure it’s detecting voltage, then check the wires you are working on to make sure there is no power. On higher voltage AC lines, you can also use a non-contact voltage detector to check the power.
As mentioned above you will need a multimeter, and you need to know how to use it. Basic multimeter functions measure the voltage, amps, and resistance in your electrical wiring. They can be helpful if you need to check if a wire is live, what the voltage is, or if it’s connected. Your multimeter will come with a red and black cable that you can use to probe circuits. It’s helpful to have both probes and alligator clips, so you can have your hands free when you’re measuring the electricity.
Suggested Reading: Amps, Volts, and Watts: What’s the Difference?

First, you plug the cables into the multimeter. The black cable plugs into COM, which stands for “common,” which will then attach to the negative side of the circuit. And the red cable plugs into the VA Omega MA port, which will then connect to the positive side circuit.
You then rotate the dial based on what you want to measure (voltage, amps, or resistance) and connect your probes or alligator clips to the wires or batteries you want to check. Always remember black cable = negative, red cable = positive for DC circuits. If you get this backward, it will read negative.
For a more detailed tutorial, check out this informative video on Youtube.
When working on an RV or boat, you will find both AC and DC systems as both have their place in the electrical wiring process. AC stands for “Alternating Current,” while DC stands for “Direct Current.” Keep these terms in mind as we learn about the difference between these two types of electricity.
Essentially, AC power can easily have its voltage changed and be transported over long distances without much power loss. This makes it ideal for the mainstream power grid. In your RV or boat, this is the shore power or generator power that powers your 120V or 230V circuits. These wires are usually black and white with one “hot” wire and one neutral. These wires are not touch-safe when on and can be a shock hazard.
On the other hand, DC power is most associated with battery power because stored energy from the batteries is DC. DC power is most commonly 12 or 24 volts on a boat or RV and is considered “touch-safe” and not a shock hazard. The wires are most commonly red and black or sometimes black and white like the AC.
How does this relate to RVs and boats?
Your shore power is AC, while your battery power is DC. Thus, to power an AC device with DC power, you must first connect the DC wire to an inverter. This is why inverters are so crucial if you’re going off-grid. It’s also vital to know the difference since running AC power through a DC wire (or vice versa) can overheat the wires and potentially start a fire, especially if the cables can’t handle the voltage or current.
When you think of a cable, you probably think of metal wires encased in some kind of plastic. This is because the metal wires are the conductor and the plastic is the insulator. The insulator protects the wires from touching other conductors (and thus producing a short). Most importantly, they protect you from getting shocked.
This is why it’s so important to cover any exposed wire and metal with an insulating material such as heat shrink or electrical tape. You don’t want to become a conductor accidentally!
Now that we’ve covered the basics, let’s talk about choosing the correct wires for your project. Electrical wires vary in several ways, including diameter, length, and type. Below, we discuss why it’s essential to know these specifications and which is right for you.
Understanding the load current that will run through your wires is essential when choosing the correct diameter. First, the bigger the diameter, the lower the wire gauge. For example, a 10-gauge wire will be thicker than a 20-gauge wire. It’s also important to remember that the thicker the wire, the more amps it can handle. Thus, a 10-gauge wire can handle 30A, while a 20-gauge wire can only handle 5A.
This is why it’s essential to know how many amps will flow through the wire. You’ll also need to know the wire length to determine resistance, the number of volts you may lose due to that resistance, the fuse size, and the number of amps that will blow a fuse. After you know all this information, you can pick a wire that can handle the intended flow of electricity.
If you’re wiring 12V batteries or other large battery bank systems, check out our article for determining the correct battery cable size for your system.
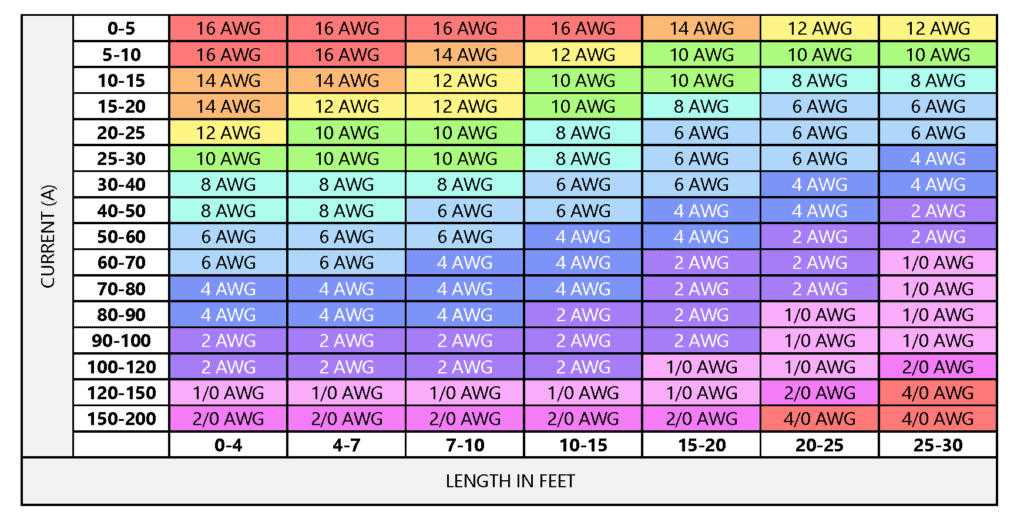
Although less common, you can also determine the wire you’ll need based on the fuse size. Each circuit on your main distribution box is rated for a certain number of amps. You can determine which size wire gauge you’ll need based on how many amps it can handle. You’ll also need to know the wire length and voltage drop to determine if you’ll have any energy loss.
Suggested Reading: What Is An Electric Fuse And Why Do They Matter?
In addition to AWG, you’ll also have to choose which type of wire will be best for your electrical undertaking. There are two different types of wires: stranded and solid. Stranded wires are made like you might expect, with strands of metal. On the other hand, solid wires just use one solid piece of metal for the conductor.
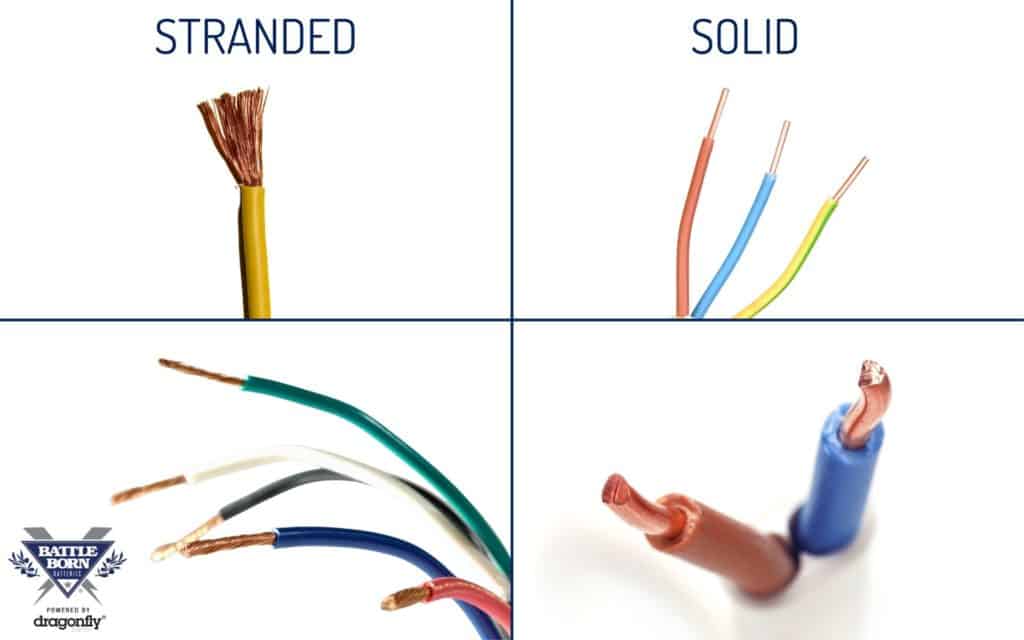
Stranded wires have many advantages. They’re flexible (and thus easier to work with), they can handle vibration, and they’re resistant to corrosion. The disadvantage? They’re a little pricier. Solid wires are usually cheaper; therefore, they can be popular for large wiring jobs (such as wiring a house).
However, they’re more prone to corrosion, harder to route, and they don’t handle heat nor movement as well as stranded wires. It’s also important that solid wires do not get bent too sharp or they can crack internally.
We recommend using copper-stranded wire when doing your own electrical wiring in your boat or RV. Not only does it do well with vibration, but it can also handle temperatures of up to 221 degrees Fahrenheit. This makes it the safest option and much easier to work with.
Now comes the fun part: actually doing the electrical wiring! Here we discuss the different methods of connecting wires–including our recommended method–as well as the various materials you’ll need.
There are several methods of connecting wires. These include crimping, soldering, twist wire nuts, and push connectors. These all have their pros and cons regarding ease, reliability, and function. Nevertheless, we highly recommend using a crimping tool to connect your wires.
Crimping your wires provides a safe and effective way to channel electricity through your boat or RV. Wire crimpers are relatively inexpensive, offer a dependable cold solder (unlike push connectors), and are much safer than other methods (such as soldering).
Twist nuts are never recommended for electrical installations in boats and RV’s. This is because they are prone to loosen due to vibration.
The most common materials that can connect wires are vinyl connectors, nylon connectors, and heat shrink. Vinyl and nylon are popular because they’re inexpensive and relatively easy to use because you don’t need any extra tools. However, they don’t insulate the wires as well as heat shrink.
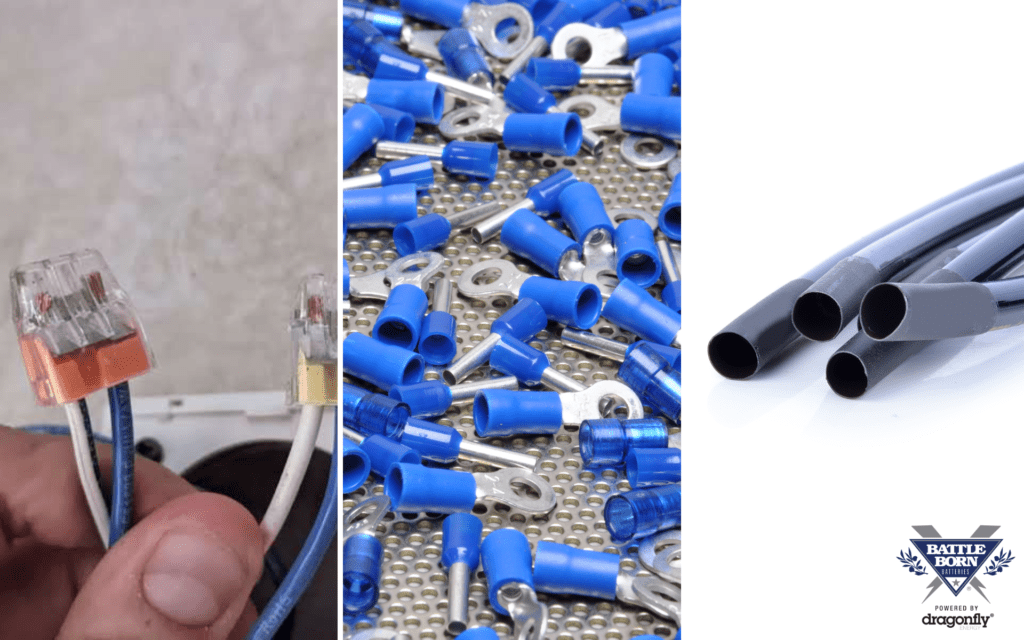
We recommend using heat shrink because it protects against abrasion and sharp edges. It also provides a fantastic seal to keep out dust and moisture and gives your wires clean structural support. Now, let’s look at the different kinds of connectors.
Terminal Rings: Terminal rings are just that: a ring that connects to your wires. They connect the cable to a connection point in your boat or RV, such as a stud or post.
Butt Connectors: Butt connectors connect two wires. They typically come in the form of a tube with one crimp on each end. You can get these connectors in waterproof versions that are good for wet location connections. These need to be heated to create a waterproof seal.
Disconnects: Disconnects isolate your wires from the source of power (usually the main distribution box).
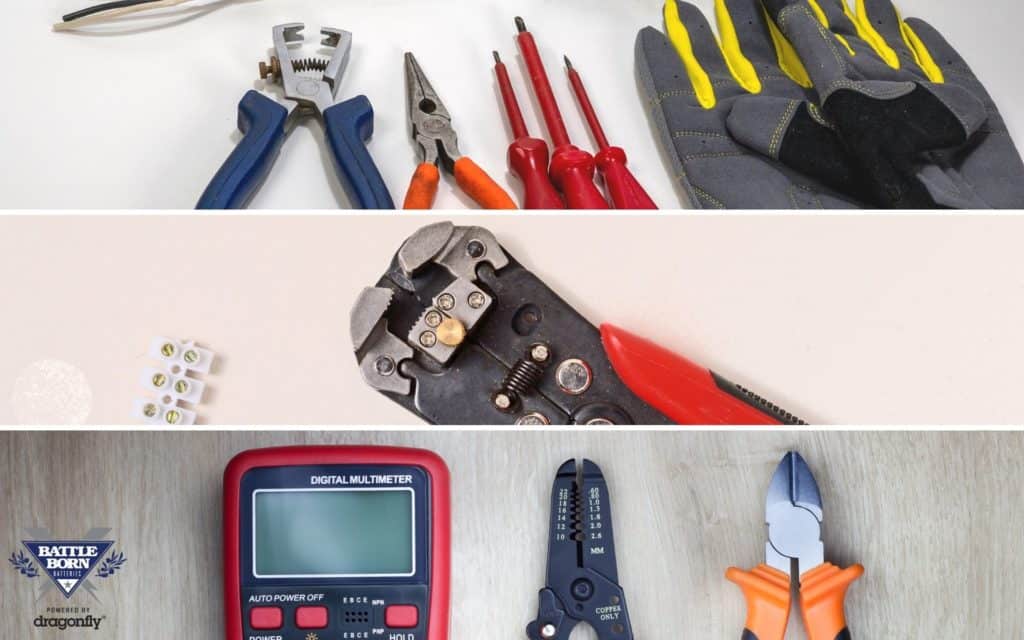
Now that we’ve covered how to connect your wires let’s talk about the tools you’ll need going forward. In addition to the multimeter, you’ll need several other tools to cut, connect, secure, and insulate. Let’s dive in.
Wire Cutters/Strippers: Not only does a wire cutter/stripper cut your wires, but it also provides a safe way of stripping the outside insulator. It typically has multiple-sized holes to accommodate wires with different diameters.
Wire Crimpers: A wire crimper crimps two conductors together. It looks similar to a pair of pliers, but it connects the wires by pinching them together.
Hydraulic Crimper: Like basic wire crimpers, a hydraulic crimper crushes metal wires together to form a connection or joint. However, they’re preferred for larger cables and/or multiple wires because these require a lot of pressure.
Cable Cutter: Cable cutters are essentially heavy-duty wire cutters. They come in various sizes and strengths and leverage your power to cut even the thickest wires.
Heat Gun: Heat guns are small, gun-shaped hand tools similar to a hairdryer, just much hotter. They, along with heat shrink, can produce an adequate seal when connecting your wires.
Split Loom Tubing: To organize, protect, and hold your wires in place, you’ll need split loom tubing. These are simple, cylindrical plastic tubes that gather wires together.
Zip Ties: Zip ties have a couple of different uses for electrical wiring. They can bundle wires together and space them apart when you have a bunch of cables in a small space.
Cable Clamps: Cable clamps can mount and run your wires along the desired route. Not only do they hold the wires together, but they also secure them to a stud or other connection point.
Rubber Grommets: Rubber grommets help run your wires through holes. They’re circular rubber pieces that protect the wires from sharp or abrasive edges.
Electrical Tape: Last but not least, you’ll need electrical tape. It’s an effective, inexpensive way to insulate your wires.
Do you know how most pliers come standard with plastic grips on the handles? All of your metal tools should be insulated this way. If not insulated properly, your screwdrivers, wrenches, and pliers can become a conductor if you come in contact with a live wire. For even better insulation, wrap up your handles with electrical tape! Always do this when connecting or disconnecting batteries.
Finally, we’re ready to install electrical wiring. Below, we discuss how to cut, connect, and insulate your wires so you can finally move on to your boating and RV adventures.
Start by cutting and stripping the wires you intend to connect with your wire cutter/strippers. Stripping the wires is removing just enough insulation material to make the connection. When stripping your wires, use the correct-sized hole and strip it, leaving just enough to crimp and connect.
Now that you have your wires cut and stripped, it’s time to connect them. Use your wire crimpers and the appropriate splice or terminal to crimp the wires. Depending on the size, you might opt for the hydraulic crimper.
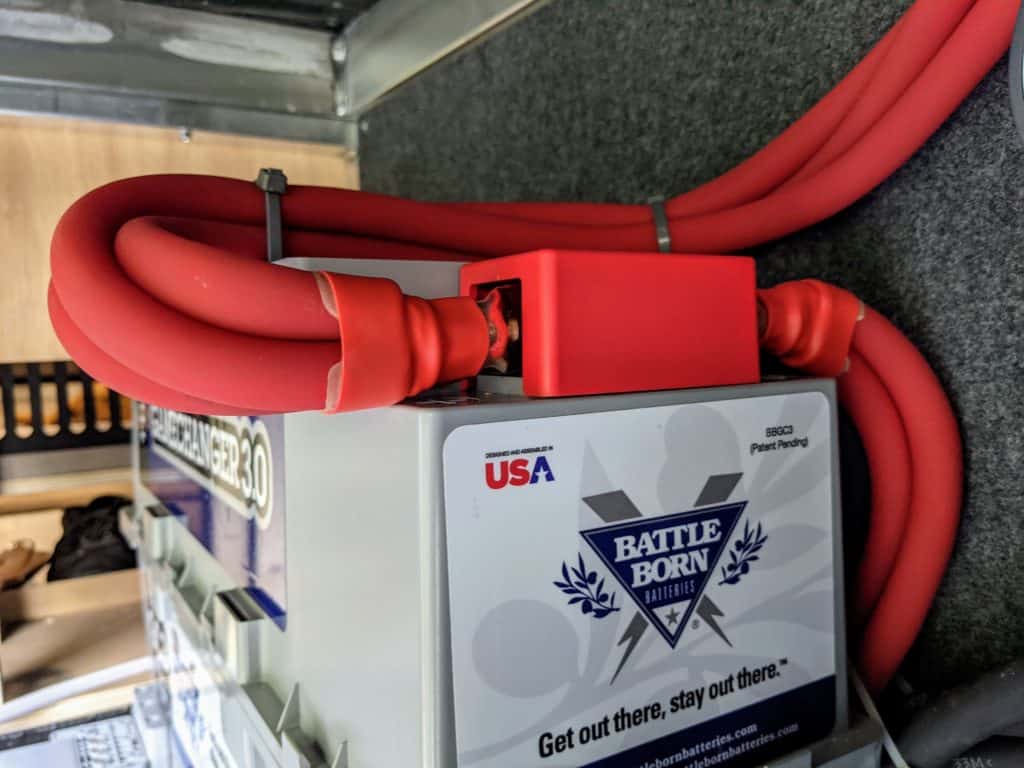
Now, it’s time to insulate and secure your wires. If you’re using butt connectors to connect your wires, use your heat gun to shrink the wrap around them until sealed. All your wires must be well insulated (use electrical tape if you need to) and secured in place. You might use cable clamps, rubber grommets (when going through holes), or zip ties. Most importantly, you should have no exposed wires, and your cables should be well-organized to reduce vibration and any chance of damage.
Wiring your own boat or RV can feel daunting. This doesn’t mean you have to hire an electrician, however. By becoming familiar with electrical wiring basics, obtaining the right tools, and understanding important safety measures, you can tackle simple wiring projects with ease.
However, if at any point you are confused or unsure, feel free to contact our technical support team to help with your project. Our Reno, Nevada-based sales and customer service team is standing by at (855) 292-2831 to take your questions!
Now, we want to hear from you! Are you undertaking an electrical project? Let us know in the comments below.
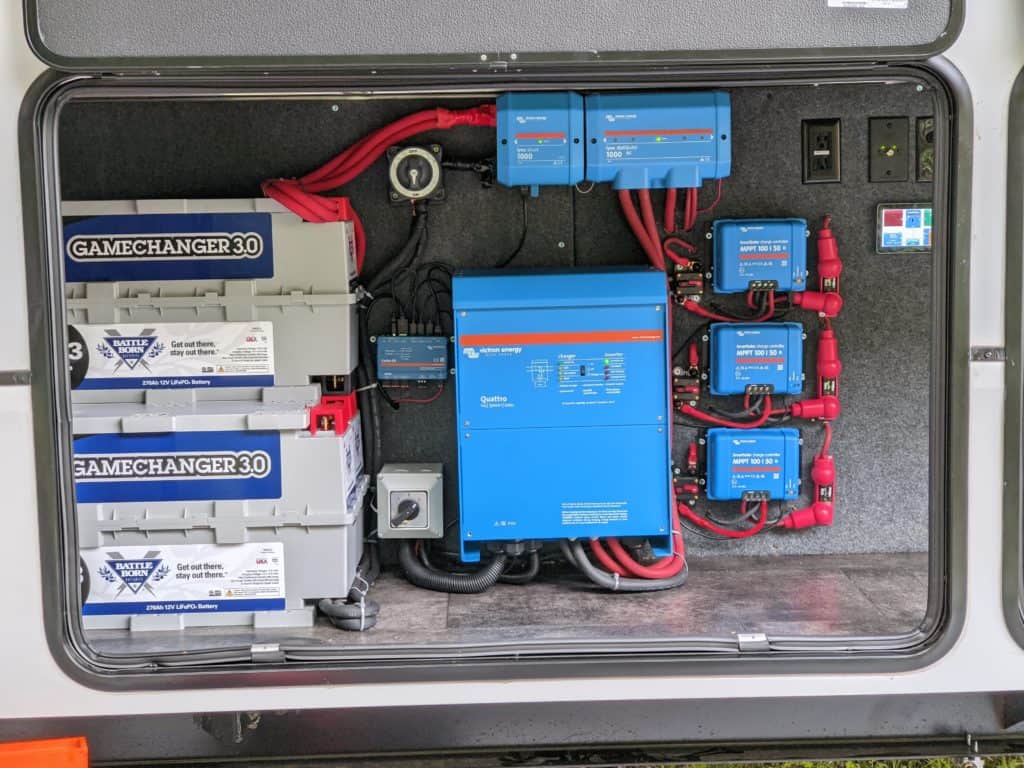
We know that building or upgrading an electrical system can be overwhelming, so we’re here to help. Our Reno, Nevada-based sales and customer service team is standing by at (855) 292-2831 to take your questions!
Also, join us on Facebook, Instagram, and YouTube to learn more about how lithium battery systems can power your lifestyle, see how others have built their systems, and gain the confidence to get out there and stay out there.
Shop Best Sellers
Ask a technical specialist now at 855.292.2831
Stay in the Know